
I’ve learned that designer counters start empty, not full. First, I clear everything and store daily-use items only—my coffee maker and utensil holder stay visible, while the bread maker goes to the garage. Then I layer back with purpose: neutral ceramic canisters near my stove, a tall pothos plant anchoring one corner, and seasonal lemons in a shallow bowl. I group odd numbers of items at varying heights, mixing textures like wood cutting boards with marble trivets. Wall-mounted magnetic bars display my knives while keeping surfaces clean. The trick? Balance decor with actual workspace so cooking stays functional and everything serves a purpose.
Start With a Clean Slate and Clear Everything

The foundation of a beautiful kitchen begins with emptiness. I’ve learned this lesson the hard way—my counters were cluttered disasters until I committed to clearing them completely. I wiped down every surface, removing everything that didn’t belong in my kitchen. This decluttering process revealed how much actual space I truly had available.
I checked behind appliances and into backsplash corners too. Those hidden spots collect dust and forgotten items. Once I’d cleared everything, I could finally see my counters with fresh eyes.
Now comes the rewarding part: deliberate placements. Instead of filling every inch, I grouped everyday essentials strategically. My coffee maker stays out because I use it daily. The blender? That goes in the pantry. This surface planning approach keeps my kitchen feeling open and welcoming.
Decide Where Hidden Storage Goes (Pantry, Closets, Garage)
I’ve found that sorting your kitchen items by how often you actually use them makes everything easier—daily essentials stay visible, while that fancy stand mixer or slow cooker you pull out a few times a year belongs in a pantry cabinet or garage shelf. Once you know what you’re keeping out, I like to assign each zone a purpose: your pantry handles dry goods and small appliances, closets work great for bulkier tools like food processors, and the garage becomes home base for seasonal equipment or backup supplies. This way, you’re not hunting through three different places when you need something, and your counters stay clear because everything has its designated spot.
Categorize Items By Frequency
Before you arrange a single item on your counter, sort everything into three honest buckets: daily-use, occasionally-used, and rarely-used.
I keep my coffee maker, utensil holder, and cutting board within arm’s reach because I use them every single day. My stand mixer goes to the closet since I bake monthly. The turkey roaster lives in the garage until November.
This categorization saves you space and keeps your counter organized. Label your hidden-storage spots clearly—use simple tags like “Daily,” “Seasonal,” and “Overflow.” Implement a rotation system. Bring items out when you need them, then return them when done.
This prevents clutter from creeping back onto your counter. You’re creating a space that works for your actual life, not some imaginary version.
Designate Off-Counter Zones
Where do you actually have space to stash things? Designating off-counter zones keeps your kitchen organized and functional. I use my pantry for small appliances—my stand mixer and blender live there now, not on the counter. My garage closet holds labeled bins organized by category: dry goods, cleaning supplies, cookware. This system keeps clutter out of sight while maintaining quick access.
Consider vertical storage solutions too. I installed wall cabinets above my sink and floating shelves in a corner closet. These maximize space efficiently. Here’s what matters: regularly rotating items between counters and storage zones maintains a clean appearance. It’s manageable once you’ve established your system. Your countertops become functional and beautiful, supporting both daily prep work and meaningful decor.
Hide Appliances You Don’t Use Every Day
How many small appliances are actually sitting on your kitchen counters right now? Hiding the ones you don’t use daily makes a real difference in how your space looks and functions.
I relocated my bread maker, blender, and coffee grinder to my pantry and garage. Suddenly, I had actual counter space for meal prep.
Store these appliances in your closet, laundry room, or pantry—wherever stays cool and dry. Use attractive décor containers for frequently accessed items like utensil holders or paper towel dispensers, but only if you actually need to replace what you have.
Keep solely your daily-use appliances visible. This simple declutter strategy lets your kitchen work better while maintaining functionality. Your counters become both attractive and practical—exactly how designers approach kitchen design.
Upgrade Everyday Basics Into Styled Containers
Now that you’ve cleared your counters of unused appliances, you can actually see what you’re working with—and honestly, it’s probably a lot of mismatched bottles and containers.
Here’s what happens next. I swapped my everyday essentials into decorated containers that actually organize my kitchen:
- Glass decanters for dish soap and hand soap replace the cluttered under-sink chaos with a cleaner display
- Matching canisters holding flour, sugar, and coffee create consistent countertop styling that looks organized
- Jars grouped on trays near my stove protect surfaces while keeping items accessible
This cohesive kitchen aesthetic didn’t require expensive purchases—I used clear glass jars and neutral containers I already owned. When everything matches visually, your whole space feels calm and organized. You’re creating a kitchen that actually shows how you think about your home.
Create Depth by Mixing Tall, Medium, and Short Pieces

Once you’ve grouped your containers and essentials, layering them at different heights creates visual interest. Combining tall pieces like a 12-inch candle with medium items such as stacked bowls and grounded canisters adds dimension that flat displays lack.
Use odd numbers—three items work well together. When you arrange a vertical element next to horizontal textures, the vignette gains depth. Pair a tall glass with a small ceramic bowl and low serving piece, and your counter becomes more organized and purposeful.
Keep your color palette to two or three hues for cohesion. Position these arrangements near your backsplash where you’ll actually use them daily. That’s where function meets practicality.
Group Items in Threes (The Designer’s Secret Rule)

Group Items in Threes (The Designer’s Secret Rule)
Every designer I’ve worked with swears by the rule of three—and once you start using it, you’ll see why it works so well. Grouping items in threes creates rhythm in your space. I discovered this when I arranged my own kitchen counters and achieved the polished look I’d been chasing.
Here’s what makes the rule of threes effective:
- Odd numbers feel naturally balanced to our eyes, creating visual harmony across your space
- A cohesive vignette with varying heights prevents flatness and draws people in
- Strategic placement breaks up counter expanse while keeping workspace functional
When you group items in threes, pair like materials together—think ceramic with ceramic, wood with wood. Position your trio near the backsplash, leaving the majority of counter usable. This approach moves kitchen counters from cluttered to deliberate, like those designer-styled homes you admire.
Mix Textures With Wood, Marble, Ceramic, and Baskets
While the rule of three gives your counter its structure, mixing different textures is what actually makes it work. I’ve learned that pairing materials creates visual interest that draws people in. Here’s how I combine them:
| Material | Best Use | Why It Works |
|---|---|---|
| Wood | Utensil holders, trays | Provides natural warmth |
| Marble | Candle bases, containers | Offers cool, elegant contrast |
| Ceramic | Vases, bowls | Provides softness against hard surfaces |
| Baskets | Storage, grouping items | Brings texture and organic appeal |
When I place a wooden tray next to marble vessels with ceramic vases, my counter looks deliberately arranged rather than random. The contrast between smooth and woven surfaces catches light differently. I add fresh branches or greenery to soften everything. Balancing these textures makes your space feel grounded and welcoming, like someone actually styled it with care.
Extend Counter Style Onto Walls With Storage and Displays

How do you keep your counter from looking cluttered while still displaying the beautiful items you love?
Extending your counter style onto walls works well for your kitchen aesthetic. Here’s what to consider:
Extend your counter style vertically onto kitchen walls to maintain aesthetic cohesion while maximizing functional storage space.
- Install magnetic bars above your prep area to hang knives and display your favorite cookware
- Mount wall storage rails that keep frequently used items accessible while freeing precious counter space
- Create vertical storage displays with decorative boards and baskets that match your counter decor below
Strategic wall storage near work zones keeps everything functional and visually integrated. Pairing magnetic bars with stylish rails creates cohesion throughout your kitchen. Your displays become part of your kitchen’s personality rather than visual clutter. This approach makes your space feel deliberately organized, with items arranged with clear purpose.
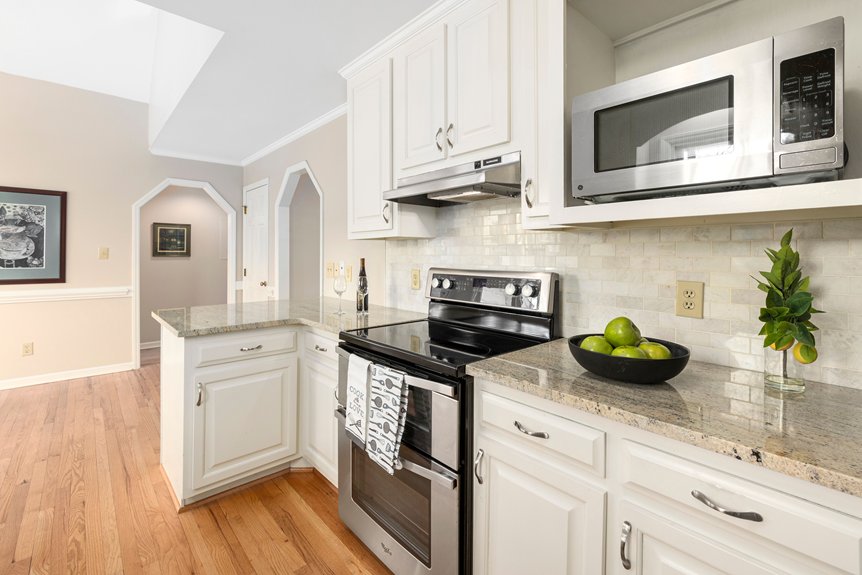
Add Living Counter Elements (Plants, Flowers, Seasonal Fruit)

I’ve found that the quickest way to refresh your kitchen counters is layering in living elements—potted herbs, a single statement plant, or even a cluster of smaller pots on a wooden tray adds texture and that lived-in feeling. Rotating seasonal touches like a bowl of fresh lemons, a small flower arrangement, or branches keeps things feeling current without creating clutter, and I typically swap these out weekly to maintain visual interest. Pairing your greenery with neutral-toned vessels—think ceramic canisters or glass vases in whites, taupes, or soft grays—creates organized groupings that feel considered rather than random, especially when you vary the heights to draw the eye naturally.
Plants For Visual Interest
When you add living plants and flowers to your kitchen counters, you’re bringing in natural color and texture that no decorative object can match.
I’ve discovered that varying plant heights creates the visual interest your countertop deserves. Here’s what works:
- Place a tall focal plant like pothos in back to anchor your display
- Add trailing varieties in front that soften edges and draw eyes downward
- Include compact herbs—basil or thyme—that smell wonderful while you cook
Low-maintenance greenery is your friend. I keep snake plants and pothos because they’re forgiving when life gets hectic. They thrive with occasional watering and indirect light, which most kitchens naturally provide.
The benefit? You’re not just decorating. You’re creating a living, breathing space that makes your kitchen feel genuinely welcoming. That’s thoughtful design at work.
Seasonal Fruit And Color
Your counters don’t have to stay the same all year long. I’ve found that rotating seasonal fruit creates an immediate, deliberate look that feels fresh and current. In winter, I group citrus fruits—oranges, lemons, and limes—in a ceramic bowl near my coffee station. The warm yellows and oranges brighten everything around them. Come spring, I switch to berries in glass decorative bowls for that pop of red and purple. Pairing seasonal fruit with potted herbs like basil or mint grounds the display beautifully. I also add slender vases with greenery branches for height and movement. This approach keeps my kitchen feeling well-designed without requiring constant fussing. The color combinations change naturally with the seasons, so my counters always look thoughtfully styled and welcoming.
Flowers And Natural Branches
Building on those seasonal fruits, flowers and branches adds height, movement, and a living quality that makes a kitchen feel active.
Mixing vase shapes creates layered visual interest without overwhelming your space. Here’s what I recommend:
- Pair tall stems in narrow vases with lower glass containers on trays for balanced proportion
- Choose flowers that coordinate with your counter material and overall color palette
- Anchor one prominent vase near your sink zone to ground the styling
Natural branches work beautifully year-round. Using seasonal greenery from your yard costs nothing and feels personal. Vary your heights and textures. A single arrangement beats cluttered counters every time. This approach keeps things fresh and welcoming without demanding constant maintenance.
Keep Your Counter Balanced: Decor Plus Workspace

How do you keep kitchen counters looking beautiful without sacrificing the space you actually need to cook? Balance means pairing pretty items with functional workspace. I use matching trays to corral oils and spices near my stove, then keep another by the sink for sponges and brushes. This strategy keeps everything accessible while maintaining an organized appearance.
I’ve also discovered that vertical elements like tiered stands and cutting board displays add height without crowding my workspace. I group items in odd numbers—a tall canister, mid-height container, and smaller functional piece—which creates natural rhythm.
| Item Type | Location | Purpose |
|---|---|---|
| Oil tray | Stove | Cooking access |
| Spice containers | Counter | Daily use |
| Brush holder | Sink | Cleanup station |
| Tiered stand | Corner | Display height |
| Glass containers | Counter | Consistent design |
This organized design approach lets me cook freely while keeping my kitchen purposeful and pleasant.