
Yes, you should insulate your basement walls—I’ve seen homeowners lose 10-15% of their heating energy through uninsulated concrete. Whether you’re finishing the space or leaving it open changes your approach. Finished basements need spray foam or fiberglass behind framing for moisture control.
Unfinished ones? Start with joist cavities for immediate savings, then add wall insulation later if plans change. Your location matters too—cold climates need R-15 to R-21, while warmer areas focus more on humidity management. There’s more strategy worth exploring here.
Why Uninsulated Basement Walls Cost You Money and Comfort

Unless you’ve felt that chill creeping up through your living room floor on a winter morning, you might not realize how much your uninsulated basement walls are costing you. I learned this the hard way when my heating bills jumped thirty percent one winter. That’s because uninsulated basement walls allow significant heat loss, forcing your HVAC system to work overtime and increasing your energy costs. Beyond money, there’s comfort—I couldn’t shake that drafty feeling upstairs despite adjusting the thermostat constantly. There’s also moisture risk. Without proper basement wall insulation, condensation builds up, promoting mold growth that threatens your home’s structure and your family’s health. Energy efficiency suffers too, making everything feel uncomfortable and expensive.
Do You Have a Finished or Unfinished Basement? (This Changes Everything)
Here’s where your basement setup affects how you should insulate. If you’ve got an unfinished basement, you have an advantage—you don’t need to insulate every surface. Focusing on floor joist cavities provides solid energy savings without a full renovation. Rigid foam boards on exposed concrete work well too. Now, if you’re finishing your basement walls with drywall, that’s different. You’ll want insulation behind those finished surfaces for thermal and moisture protection. Closed-cell spray foam creates an airtight seal that protects against moisture damage. The good news? Building codes don’t require you to insulate both walls and ceiling. You can meet standards by insulating the area that matches your usage. It’s about matching your setup to your needs.
Local Building Codes: What Your Jurisdiction Actually Requires

What does your local building department actually expect when you’re insulating basement walls? I’ve learned that codes aren’t one-size-fits-all, and skipping this step can cost you during inspections.
Here’s what typically matters in your area:
- Minimum R-values required – Your climate zone determines whether you need R-10, R-15, or higher basement wall insulation ratings
- Vapor barrier specifications – Most jurisdictions mandate moisture protection, often requiring polyethylene or kraft-faced batts
- Fire safety requirements – Drywall covering insulation is usually mandatory, not optional
- Alternative compliance paths – Some areas let you insulate joist cavities instead of full walls
I always call my local building department before starting any basement project. They’ll clarify exact requirements and acceptable materials. Many jurisdictions offer online resources too. Getting this right upfront saves headaches later.
Finished Basements Need Wall Insulation Behind Your Framing

When you’re finishing your basement, insulating behind that framing isn’t just helpful—it’s required if you want your space to feel comfortable. I’ve learned that creating a proper thermal barrier provides significant benefits between a chilly room and one that feels livable.
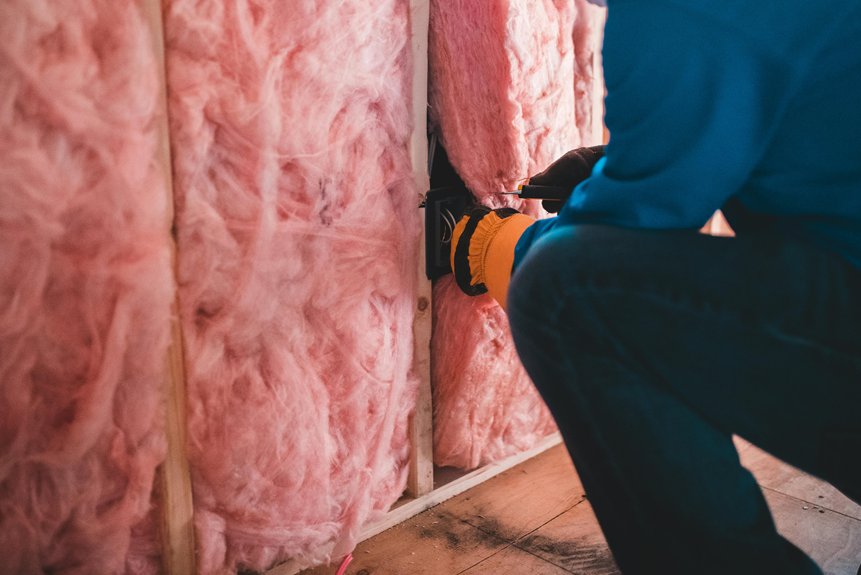
You’ve got solid options here. Spray foam insulation works well—it seals air leaks and stops cold from penetrating through. Rigid foam boards on concrete walls also do the job well. I always recommend addressing moisture management first, though. You don’t want problems hiding behind your walls later.
The key? Get that insulation between your concrete basement walls and your wood framing. This setup keeps warmth where it belongs: inside your finished space. Your family will notice the difference right away.
Unfinished Basements: Insulate Walls or Ceiling First?

Should you insulate your basement walls or focus on the ceiling? I’d recommend starting with joist cavities, then deciding on wall treatment based on your plans.
Here’s what I’ve learned from helping neighbors tackle this:
- Ceiling insulation separates your living space from basement cold, reducing upstairs heat loss immediately
- Joist-cavity insulation yields significant energy savings without the moisture complexity of full wall treatment
- Wall insulation matters most if you’re finishing later, since drywall traps condensation without it
- Moisture controls become important if you’re seeing dampness or planning permanent living space
I typically start by insulating those joist cavities with fiberglass or mineral wool batts. This gives you real savings now. Then, if basement finishing happens later, you’ll add basement walls insulation behind your framing. It’s practical, phased, and lets you adapt as your plans evolve.
Spray Foam vs. Fiberglass: Pick the Right Material

When I’ve helped friends insulate their basements, I’ve found that spray foam creates a real difference—it seals air leaks that fiberglass simply can’t match, giving you R-6.5 to R-7 per inch versus fiberglass’s R-3 to R-4, which means you’ll need less thickness to reach your target insulation value. The trade-off is real though: spray foam runs two to three times more expensive and needs a professional installer, while fiberglass batts let you DIY for maybe a quarter of the cost, though you’ll fight air gaps and moisture problems that spray foam handles naturally. In my experience with damp basements, spray foam’s vapor management pays for itself over time by preventing the mold issues I’ve seen with fiberglass that wasn’t sealed perfectly.
Airtight Seal Performance
Why does one insulation material seal your basement walls tight while the other leaves gaps you can practically feel?
I’ve learned that spray foam creates a true airtight seal against concrete, improving your insulation efficiency and moisture control. Fiberglass, though cheaper, often leaves tiny air gaps that compromise performance. Here’s what matters most:
- Spray foam expands into cracks, eliminating air leaks completely
- Fiberglass batts shift over time, creating unwanted pathways for moisture
- Your basement’s airtight seal prevents costly energy waste year-round
- Moisture control protects your home’s structural integrity and your family’s health
Closed-cell spray foam delivers R-6.5 to R-7 per inch, while fiberglass manages only R-3 to R-4. I’ve seen firsthand how that difference improves basement comfort. The superior airtight performance of spray foam makes a real difference in your home’s protection.
Material Cost Comparison
The upfront cost difference between spray foam and fiberglass is significant—and it’s probably the first thing you’ll notice when getting quotes. Fiberglass batts run maybe $0.50 to $1.50 per square foot, making basement insulation cost manageable for tight budgets. Spray foam, though? You’re looking at $1.50 to $3.50 per square foot. That’s a noticeable expense.
Here’s what I’ve learned: fiberglass demands less per inch, but spray foam’s superior R-value per inch means you’ll need less material overall. Closed-cell spray foam hits around 6.5 R-value per inch versus fiberglass’s 3.2 to 3.8. In my damp basement situation, that moisture barrier benefit justified the investment. For controlled spaces though, fiberglass works well when you’re diligent about installation and vapor barriers.
Why Basement Insulation Stops Mold and Dampness

It prevents that frustrating moment when warm, humid air hits your cold basement walls and turns into condensation. I’ve watched this moisture problem destroy countless basements, but insulation with a vapor barrier makes a real difference.
Here’s what proper basement insulation does for you:
- Stops condensation by keeping walls warmer, so moisture can’t collect on chilly surfaces
- Controls the dew point, preventing that perfect environment where mold loves to grow
- Blocks moisture migration from ground into your wall assemblies with vapor barrier protection
- Reduces humidity levels throughout your entire basement space
Combine insulation with good drainage and ventilation, and you’re protecting your investment. I’ve seen basements go from damp, moldy spaces into dry, healthy areas. That’s the kind of peace of mind worth having.
Interior Retrofit: The Budget-Friendly Method

If you’re looking to keep your wallet happy while tackling basement insulation, interior retrofit work with standard wall framing and fiberglass batts is your best option—I’ve seen homeowners save thousands by avoiding excavation and exterior barriers. You can frame out 2×4 walls, stuff them with R-13 or R-15 batts (they’re cheap and easy to cut), and finish with drywall, which takes real elbow grease but definitely cuts labor costs. The DIY route works especially well in unfinished basements where you’re not worried about perfection, though spray foam runs pricier at $1 to $2 per square foot compared to batts at about 25 cents.
Cost-Effective Wall Framing
Why spend money digging up your foundation when you can build right over what’s already there? I’ve found that interior framing is your smartest move for cost-effective basement insulation. You’re working with existing concrete walls, which means no excavation headaches or expensive foundation work.
Here’s what makes this approach work:
- You install standard 2×4 studs directly against concrete, creating a cavity for insulation
- Spray foam or polyiso rigid foam fills gaps, sealing air leaks effectively
- Vapor barriers prevent moisture from damaging behind your new walls
- Drywall and fire-rated coverings finish everything affordably
I prioritize insulating joist cavities first—they deliver the biggest energy savings. Between the studs, I layer insulation carefully, then add moisture management protection. This interior framing method keeps your project budget-friendly while protecting against mold and dampness.
DIY Installation Techniques
Now that you’ve got your framing strategy locked down, let’s talk about actually getting your hands dirty with the installation. I’ve found that starting with moisture control makes everything easier later. Measure your basement walls carefully, then cut rigid foam board to fit snugly between studs or directly on concrete.
| Step | Material | Key Detail |
|---|---|---|
| Prep | Foam board | Cut 1-2 inches smaller for fit |
| Seal | Foil tape | Cover every seam completely |
| Insulate | Fiberglass batts | Don’t compress—maintain R-value |
| Finish | Drywall | Meets fire safety requirements |
Seal all seams with foil tape to prevent moisture migration through your basement walls. This step matters more than you’d think. I always double-check corners because moisture sneaks through gaps. Install your insulation without compressing it—that’s where homeowners lose performance. Finally, cover everything with drywall for fire safety and a finished appearance.
Exterior Insulation: Better Protection During New Construction

When you’re building a new home or doing major foundation work, here’s something I’ve learned matters: installing insulation on the outside of your basement walls beats adding it inside almost every time.
Exterior insulation gives you continuous thermal protection around your foundation walls, which means consistent warmth and better moisture management. I’ve watched rigid foam boards work well in basements during construction. You’ll avoid those cold bridges that plague interior framing.
Here’s why this approach works:
- Uniform basement temperatures that feel comfortable
- Moisture stays outside where it belongs
- No wasted interior space or framing complications
- Long-term performance that protects your investment
Yes, excavation’s required, which makes timing important. But I’m telling you, the sealing at seams and waterproofing measures deliver results worth the effort.
Above-Grade vs. Below-Grade: Where Insulation Matters Most

They’ll insulate their basement foundation walls and wonder why their energy bills barely budge. Here’s what I’ve learned: above-grade insulation matters far more than below-grade concrete alone. Your basement’s above-ground portions face outdoor temperature swings, so they need continuous thermal protection. I’ve seen homeowners skip this and regret it.
Below-grade concrete walls? They offer limited energy savings by themselves. Instead, focus your efforts on above-grade sections using rigid foam boards with proper moisture barriers. This combination works better than relying solely on below-grade concrete.
For finished basements, insulating interior wood-frame walls and gaps between studs creates a more complete thermal barrier. You’re building a team effort here—not just relying on concrete’s minimal resistance. Many building codes actually let you meet requirements by insulating either above-ground walls or ceilings, not necessarily both.
Cold Climates vs. Warm Climates: How Location Changes Your Strategy

Where you live changes everything about basement insulation strategy. I’ve learned this the hard way living through New England winters and talking with friends in milder regions.
In cold climates like Vermont and New Hampshire, I prioritize aggressive basement insulation to combat heat loss and keep upstairs floors comfortable. You’ll want R-15 to R-21 on walls, paired with spray foam for airtightness. Moisture control matters too—condensation creates mold problems fast.
Warmer climates shift focus differently:
- Your basement fights humidity instead of extreme cold
- Rigid foam or batts work well without aggressive sealing
- Moisture barriers become your primary defense
- Energy efficiency still counts, just less intensely
I’ve found that matching your climate zone’s specific needs—not copying northern strategies—saves money and prevents headaches. Your location genuinely determines whether you’re battling cold or moisture first.
What Really Happens If You Skip Basement Insulation
Your heating bills climb steadily, cold creeps up through your floors, and moisture problems snowball fast. I’ve seen it happen to friends who skipped basement insulation. Without it, you’re losing precious heat through those walls—especially in winter months. That heat loss forces your furnace to work overtime, and your energy bills reflect it monthly.
Condensation becomes another headache. When warm air meets cold, uninsulated surfaces, moisture appears on walls and pipes. I watched mold creep across one neighbor’s basement within months. That dampness affects your home’s air quality upstairs too.
Here’s what hits hardest: your energy efficiency drops. Inspectors note it, buyers see it, and your resale value declines. You’re throwing money away instead of investing in proper basement insulation now.